---
title: Sending rejection emails to applicants you're removing from consideration
description: Learn how to find and customize the rejection email sent out to candidates not moving on to the next hiring step.
---
[Skip to content](https://adpsupport.careerplug.com/editing-the-rejection-email-template#main-content)
[Submit a Request](https://adpsupport.careerplug.com/kb-tickets/new?hsLang=en)
[![CP ADP Logo 2025.png\]](https://adpsupport.careerplug.com/hs-fs/hubfs/CP%20ADP%20Logo%202025.png?width=297&height=40&name=CP%20ADP%20Logo%202025.png)](https://adpsupport.careerplug.com?hsLang=en)
Open main navigation
Close main navigation
- [Submit a Request](https://adpsupport.careerplug.com/kb-tickets/new)
- [Get help now!](https://adpsupport.careerplug.com/help)
[Get help now!](https://adpsupport.careerplug.com/help?hsLang=en)
How can we help?
- There are no suggestions because the search field is empty.
1. [ADP Help Center](https://adpsupport.careerplug.com/?hsLang=en)
2. [Hiring Tools & Automations](https://adpsupport.careerplug.com/hiring-tools-automations?hsLang=en)
3. [Templates](https://adpsupport.careerplug.com/hiring-tools-automations?hsLang=en#templates)
# Sending rejection emails to applicants you're removing from consideration
When you're ready to remove an applicant from consideration, you should [deactivate them](https://adpsupport.careerplug.com/deactivating-an-applicant?hsLang=en) and send a rejection email informing them of your decision.
**We highly recommend sending a rejection email to all applicants.** It's better for a candidate to hear bad news from you than to hear nothing at all.
Your CareerPlug account already includes an Applicant Rejection email template to help you get started, but we recommend creating your own custom template to tailor the message to your brand's voice.
Sending rejection emails also counts toward your [CareerPlug Achievements](https://adpsupport.careerplug.com/attracting-better-applicants-with-achievements?hsLang=en). These badges can show job seekers your commitment to an attentive and considerate hiring process and improve your employer brand.
##### In this article:
- [Creating a custom rejection email template](https://adpsupport.careerplug.com/editing-the-rejection-email-template#creating-custom-rejection-email-template)
- [Deactivating an applicant and sending a rejection letter via email](https://adpsupport.careerplug.com/editing-the-rejection-email-template#deactivating-and-sending-a-rejection-letter)
### Creating a custom rejection email template
To edit the rejection email template, you'll need to make a copy of it first.
1\. Navigate to **Company settings (gear icon) \> Templates \> General Messages**.
.png?width=670&height=271&name=Settings%2c%20Template%2c%20General%20Messages%20(Nav%20bar%20minimized).png)
2\. Scroll down to the Applicant Rejection section and click the **Edit **button to the right of the **General Accounts - Applicant Rejection **email template.
3\. A pop-up will notify you that this will create a copy of the template for you to edit. Click the **Continue** button.

4\. Enter a **Title** for your new template.
5\. Click the **Category** drop-down menu and select **Applicant Rejection**.

6\. Customize the **Subject** and **Body** of your new message template.
7\. Click the **Include email signature by default** checkbox to have your email signature added to the end of every email sent using this template.
8\. Click the **Add Attachments** button to include additional documents with your message. Click the **Choose File** link that appears below to upload a file from your device. You need to click **Add Attachments** each time you want to include another file.
9\. When you're finished customizing your template, click the **Save and Exit** button.
### Deactivating an applicant and sending a rejection letter via email
1\. Navigate to your **Applicants** page
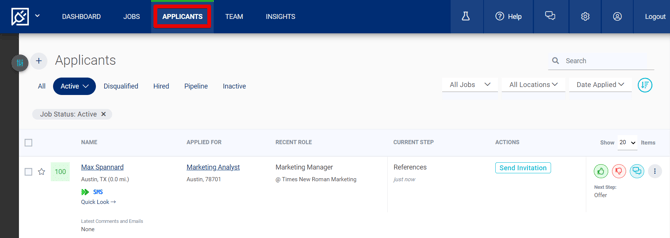
2\. Find the applicant you want to deactivate and click the red **thumbs-down icon**.
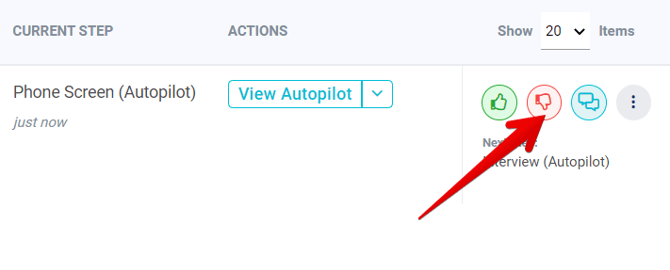
**Need help finding an applicant?** Click the "**X**" on the right edge of the **Job Status: Active** filter to remove it. This filter — which is on by default any time you log into CareerPlug — hides applicants from your closed, passive, and draft jobs from view.
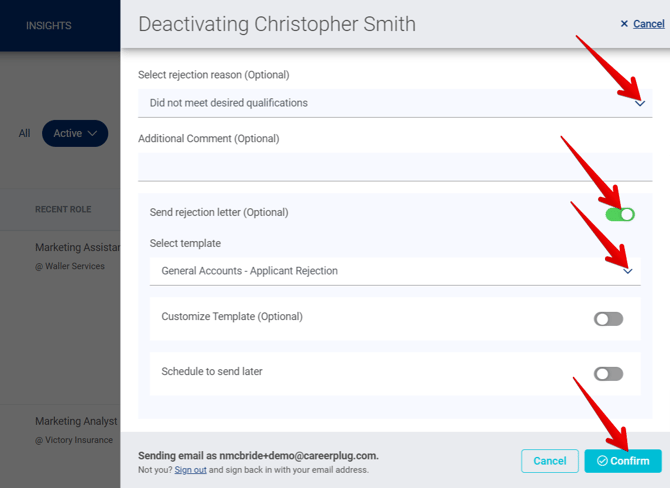
3\. Choose a rejection reason from the **Select rejection reason** drop-down menu. The rejection reason is for internal use only and will not be seen by the applicant.
4\. Turn on the **Send rejection letter** toggle.
5\. Choose a rejection letter template from the **Select template** drop-down menu.
6\. To edit the rejection letter's message before sending it, turn on the **Customize Template** toggle and make any changes to the **Subject** and **Email content**.
7\. To send your email at a later time, turn on the **Schedule to send later** toggle and select a **Send Date** and **Time** for the message to be sent to the applicant. The **Timezone** will be set to your account's default time zone.
8\. Click the **Confirm** button.
- [Getting Started](https://adpsupport.careerplug.com/getting-started?hsLang=en#main-content)
- [CareerPlug 101](https://adpsupport.careerplug.com/getting-started?hsLang=en#careerplug-101)
- [How To Hire](https://adpsupport.careerplug.com/getting-started?hsLang=en#how-to-hire)
- [Account Set Up](https://adpsupport.careerplug.com/account-set-up?hsLang=en#main-content)
- [About Your Account](https://adpsupport.careerplug.com/account-set-up?hsLang=en#about-your-account)
- [Billing](https://adpsupport.careerplug.com/account-set-up?hsLang=en#billing)
- [Configuring Your Account](https://adpsupport.careerplug.com/account-set-up?hsLang=en#configuring-your-account)
- [Locations](https://adpsupport.careerplug.com/account-set-up?hsLang=en#locations)
- [Your Careers Page](https://adpsupport.careerplug.com/account-set-up?hsLang=en#your-careers-page)
- [Notifications](https://adpsupport.careerplug.com/account-set-up?hsLang=en#notifications)
- [User Access](https://adpsupport.careerplug.com/account-set-up?hsLang=en#user-access)
- [Admin](https://adpsupport.careerplug.com/account-set-up?hsLang=en#admin)
- [Support](https://adpsupport.careerplug.com/support?hsLang=en#main-content)
- [Contacting Support](https://adpsupport.careerplug.com/support?hsLang=en#contacting-support)
- [Troubleshooting](https://adpsupport.careerplug.com/support?hsLang=en#troubleshooting)
- [Live Trainings](https://adpsupport.careerplug.com/support?hsLang=en#live-trainings)
- [Job Postings](https://adpsupport.careerplug.com/job-postings?hsLang=en#main-content)
- [About Your Jobs](https://adpsupport.careerplug.com/job-postings?hsLang=en#about-your-jobs)
- [Creating & Editing Job Postings](https://adpsupport.careerplug.com/job-postings?hsLang=en#creating-editing-job-postings)
- [Sponsoring Jobs](https://adpsupport.careerplug.com/job-postings?hsLang=en#sponsoring-jobs)
- [Passive Recruiting](https://adpsupport.careerplug.com/job-postings?hsLang=en#passive-recruiting)
- [Managing Your Jobs](https://adpsupport.careerplug.com/job-postings?hsLang=en#managing-your-jobs)
- [Sharing Your Jobs](https://adpsupport.careerplug.com/job-postings?hsLang=en#sharing-your-jobs)
- [Job Boards](https://adpsupport.careerplug.com/job-postings?hsLang=en#job-boards)
- [Applicant Flow](https://adpsupport.careerplug.com/job-postings?hsLang=en#applicant-flow)
- [Applicant Tracking](https://adpsupport.careerplug.com/applicant-tracking?hsLang=en#main-content)
- [Applicant Information](https://adpsupport.careerplug.com/applicant-tracking?hsLang=en#applicant-information)
- [Managing Applicants](https://adpsupport.careerplug.com/applicant-tracking?hsLang=en#managing-applicants)
- [Sorting & Filtering Applicants](https://adpsupport.careerplug.com/applicant-tracking?hsLang=en#sorting-filtering-applicants)
- [Contacting Applicants](https://adpsupport.careerplug.com/applicant-tracking?hsLang=en#contacting-applicants)
- [Interviewing Applicants](https://adpsupport.careerplug.com/applicant-tracking?hsLang=en#interviewing-applicants)
- [Applicant Activity](https://adpsupport.careerplug.com/applicant-tracking?hsLang=en#applicant-activity)
- [Hiring](https://adpsupport.careerplug.com/applicant-tracking?hsLang=en#hiring)
- [Applicant Experience](https://adpsupport.careerplug.com/applicant-tracking?hsLang=en#applicant-experience)
- [Hiring Tools & Automations](https://adpsupport.careerplug.com/hiring-tools-automations?hsLang=en#main-content)
- [Autopilot](https://adpsupport.careerplug.com/hiring-tools-automations?hsLang=en#autopilot)
- [Hiring Process](https://adpsupport.careerplug.com/hiring-tools-automations?hsLang=en#hiring-process)
- [Automations](https://adpsupport.careerplug.com/hiring-tools-automations?hsLang=en#automations)
- [Prescreen Questions](https://adpsupport.careerplug.com/hiring-tools-automations?hsLang=en#prescreen-questions)
- [Assessments](https://adpsupport.careerplug.com/hiring-tools-automations?hsLang=en#assessments)
- [Email & Text Messages](https://adpsupport.careerplug.com/hiring-tools-automations?hsLang=en#email-text-messages)
- [Scorecards](https://adpsupport.careerplug.com/hiring-tools-automations?hsLang=en#scorecards)
- [Offer Letters](https://adpsupport.careerplug.com/hiring-tools-automations?hsLang=en#offer-letters)
- [Templates](https://adpsupport.careerplug.com/hiring-tools-automations?hsLang=en#templates)
- [Integrations](https://adpsupport.careerplug.com/hiring-tools-automations?hsLang=en#integrations)
- [Other Tools](https://adpsupport.careerplug.com/hiring-tools-automations?hsLang=en#other-tools)
- [Reporting & Compliance](https://adpsupport.careerplug.com/reporting-compliance?hsLang=en#main-content)
- [Reporting](https://adpsupport.careerplug.com/reporting-compliance?hsLang=en#reporting)
- [Charts](https://adpsupport.careerplug.com/reporting-compliance?hsLang=en#charts)
- [Compliance](https://adpsupport.careerplug.com/reporting-compliance?hsLang=en#compliance)
- [FAQs & Integrations](https://adpsupport.careerplug.com/faqs-integrations?hsLang=en#main-content)
- [The CareerPlug + ADP Partnership](https://adpsupport.careerplug.com/faqs-integrations?hsLang=en#the-careerplug-adp-partnership)
- [Integrations](https://adpsupport.careerplug.com/faqs-integrations?hsLang=en#integrations)
- [What's New](https://adpsupport.careerplug.com/whats-new?hsLang=en#main-content)
- [Monthly Updates](https://adpsupport.careerplug.com/whats-new?hsLang=en#monthly-updates)
- [Account Changes](https://adpsupport.careerplug.com/whats-new?hsLang=en#account-changes)
[](https://adpsupport.careerplug.com?hsLang=en)
Handcrafted in Austin, Texas
© 2026 CareerPlug. All rights reserved.